
Start by using the Dremel grinding stone to cut back the Ford front turn signal lenses that
are molded into the body of the car. Your Edsel grille has the turn signal lenses built
into it already.
(Follow this section's advice at your discretion. You'll see why in a minute.)
Carefully grind out a section on both front quarterpanels in the shape of the
spear. Test-fit the grill frequently to determine where and how deep the channels
should be. Note that making this gap weakens the vinyl. I found out how much
so when both sides broke off on me during sanding operations. Cementing the pieces
back on actually afforded some flexibility, as they were able to be repositioned slightly
inboard for a much better fit. Perhaps it's better to avoid the whole side-cutting
thing in this case, and instead use some heat to bend the front quarters to meet the
grille. Your call.
 Hood
Both the 1960 Ford and Edsel hoods have the same basic size and shape, but the Ford comes
with an indented center section, while the Edsel is uniform across the whole hood with a
raised ridge running down the center. Use the modeling putty to fill in the indented
section. Once it's dry, sand it with 400 grit paper. I found that trying to
create the center ridge at this point was too difficult. The sanding made it tough to
keep it at an even height and in a straight line, so get the hood to the point where it's
completely smooth first Once you're happy with the look and feel, then make a thin
line of putty running up the center of the hood, forming it with a razor blade to keep it
straight. Once this is dry, spread a little more on each side of the line and blend
it from the ridge down to the hood. After this is dry (you'll find that there's a lot
of patience involved in Phase II), sand it smooth with 400 grit sandpaper. Then
finish the entire hood with 600 grit paper to give it a glass-like feel.
Hood
Both the 1960 Ford and Edsel hoods have the same basic size and shape, but the Ford comes
with an indented center section, while the Edsel is uniform across the whole hood with a
raised ridge running down the center. Use the modeling putty to fill in the indented
section. Once it's dry, sand it with 400 grit paper. I found that trying to
create the center ridge at this point was too difficult. The sanding made it tough to
keep it at an even height and in a straight line, so get the hood to the point where it's
completely smooth first Once you're happy with the look and feel, then make a thin
line of putty running up the center of the hood, forming it with a razor blade to keep it
straight. Once this is dry, spread a little more on each side of the line and blend
it from the ridge down to the hood. After this is dry (you'll find that there's a lot
of patience involved in Phase II), sand it smooth with 400 grit sandpaper. Then
finish the entire hood with 600 grit paper to give it a glass-like feel.
Front and Rear Bumpers There's just a little
grinding of the front bumper assembly to be done, as the mounting holes don't line up with
the Country Squire's front screw columns. You may also want to grind
down the "1960" that's molded into the spot where the license plate will go. If you do
decide to put tags on the car, don't apply the decal directly to the bumper. Instead,
cut a rectangle of sheet styrene slightly larger than the decal, and paint this
chrome. Then apply the decal to this piece, to get a nice flat plate that looks like
it's in a frame.
 The rear bumper is another story. The Ford wagon has its taillights molded in, while the
Edsel bumper does not, and the Edsel has two vertical indentations where the Ford does
not. So for starters, those lights have to go. This is where the hacksaw comes
in. As best as you can, slice off the tail lights from the bumper, and grind down the
"U" shaped channels that are built into the bumper body. Sand it until everything's
smooth (Don't worry about removing the chrome plating). Then using the modeling putty,
form two indentations that will line up to the Edsel taillights later on. Allow this
to dry, and sand these a little so they appear to be just raised ridges rather than bumper
guards. The bumper will soon be covered with a super-thin layer of metal foil, but
before you do, simulate the bumper bolts by using a toothpick to place a tiny drop of paint
(any color) on the bumper. One goes dead center between each putty line, one goes high
beside the outermost putty lines, one goes on the top of the bumper's flat surface in the
center and one goes on each side of this, about half way to the edge (7 total). The
foil is so thin, it will show off this detail up in a big way.
The rear bumper is another story. The Ford wagon has its taillights molded in, while the
Edsel bumper does not, and the Edsel has two vertical indentations where the Ford does
not. So for starters, those lights have to go. This is where the hacksaw comes
in. As best as you can, slice off the tail lights from the bumper, and grind down the
"U" shaped channels that are built into the bumper body. Sand it until everything's
smooth (Don't worry about removing the chrome plating). Then using the modeling putty,
form two indentations that will line up to the Edsel taillights later on. Allow this
to dry, and sand these a little so they appear to be just raised ridges rather than bumper
guards. The bumper will soon be covered with a super-thin layer of metal foil, but
before you do, simulate the bumper bolts by using a toothpick to place a tiny drop of paint
(any color) on the bumper. One goes dead center between each putty line, one goes high
beside the outermost putty lines, one goes on the top of the bumper's flat surface in the
center and one goes on each side of this, about half way to the edge (7 total). The
foil is so thin, it will show off this detail up in a big way.
Tail Lights The
first thing to do here is to fill the gap left by the Ford taillights. Cement pieces
of sheet styrene to the interior of the car, across the back of the tailgate. When this
base is dry, use the modeling putty to fill in the area, contouring it like the rest of the
tailgate. Be sure not to cover the hinges at the base of the tailgate.
 Originally, I intended to install oval taillight housings for the 1960 Edsel hardtop promo,
also available from ModelHaus. Like the real car, the taillights on the Villager are
much smaller than on other models, but these were already chromed and had the perfect
shape. As I built-up a base for the housings using more putty, I found that the putty
could be formed into small ovals without much difficulty. Plus, once they're dry, more
details can be etched around the edge of each lens housing in using the Exacto blade, and the
grinding wheel could flatten the lenses into the smoothness that was required. So I ended
up abandoning the chrome pieces in favor of hand-molding lights in the correct scale. Try
it yourself if you have the patience.
Originally, I intended to install oval taillight housings for the 1960 Edsel hardtop promo,
also available from ModelHaus. Like the real car, the taillights on the Villager are
much smaller than on other models, but these were already chromed and had the perfect
shape. As I built-up a base for the housings using more putty, I found that the putty
could be formed into small ovals without much difficulty. Plus, once they're dry, more
details can be etched around the edge of each lens housing in using the Exacto blade, and the
grinding wheel could flatten the lenses into the smoothness that was required. So I ended
up abandoning the chrome pieces in favor of hand-molding lights in the correct scale. Try
it yourself if you have the patience.
Tailgate The
Edsel Villager has a chrome panel that runs across the tailgate, which creates two
sideways "V" channels with the side fins. It's comprised of a series of horizonal
chrome bars encased in a wider chrome frame, with a chrome "Villager" script across its
center. It gives the car a stunning, stylish look that's really unique. As a model
builder, you hate "unique" because that translates into "more stuff to scratch-build".
 To come up with this panel, start by cutting a piece of sheet styrene a little larger than
the bar area. Cover this with a thin layer of plastic cement, and lay out five strips of
0.020-inch styrene rods side-by-side to come up with horizontal bars. Cut a second piece
of sheet styrene and glue this on after the last rod, to be used as the base of the
frame. Set this assembly aside to dry. Going back to the car, take a
cardboard/manilla folder and cut out the shape of the panel (basically a long rectangle with
the sides cut down in an arc that tapers down from top to bottom). Fit this against the
car to come up with a template that you're happy with. Use the cardboard as a guide to
carefully cut out the shape of the panel once the glue has dried completely. Now that
the piece is cut to shape, build up the sides of the chrome frame by running a little of the
modeling putty along the left and right sides with your finger. Shave off any excess
with the Exacto blade, and lightly sand it once it's dry. Set this aside for now.
To come up with this panel, start by cutting a piece of sheet styrene a little larger than
the bar area. Cover this with a thin layer of plastic cement, and lay out five strips of
0.020-inch styrene rods side-by-side to come up with horizontal bars. Cut a second piece
of sheet styrene and glue this on after the last rod, to be used as the base of the
frame. Set this assembly aside to dry. Going back to the car, take a
cardboard/manilla folder and cut out the shape of the panel (basically a long rectangle with
the sides cut down in an arc that tapers down from top to bottom). Fit this against the
car to come up with a template that you're happy with. Use the cardboard as a guide to
carefully cut out the shape of the panel once the glue has dried completely. Now that
the piece is cut to shape, build up the sides of the chrome frame by running a little of the
modeling putty along the left and right sides with your finger. Shave off any excess
with the Exacto blade, and lightly sand it once it's dry. Set this aside for now.
 Side Trim The
next thing to go on the body is the Ford trim and scripts. Using the Dremel tool with
a grinding stone, SLOWLY start wearing through the side trim that runs from the front door to
the rear quarterpanel, plus the "Country Squire" scripts at the rear and the FORD letters on
the tailgate. Get the sides down until they are fairly smooth, with no details
remaining. (Take caution on the driver's side not to disturb the fuel fill
door!) Stop frequently during the grinding operation to make sure you're not going any
deeper than the trim-level, and that you're maintaining the curve of the body. When
you've got most of the trim gone, sand it further with 400 grit sandpaper. Follow this
up with 600 grit paper to get a smooth finish. Using the Exacto knife, etch the door
lines a little to keep a consistant depth around the whole door.
Side Trim The
next thing to go on the body is the Ford trim and scripts. Using the Dremel tool with
a grinding stone, SLOWLY start wearing through the side trim that runs from the front door to
the rear quarterpanel, plus the "Country Squire" scripts at the rear and the FORD letters on
the tailgate. Get the sides down until they are fairly smooth, with no details
remaining. (Take caution on the driver's side not to disturb the fuel fill
door!) Stop frequently during the grinding operation to make sure you're not going any
deeper than the trim-level, and that you're maintaining the curve of the body. When
you've got most of the trim gone, sand it further with 400 grit sandpaper. Follow this
up with 600 grit paper to get a smooth finish. Using the Exacto knife, etch the door
lines a little to keep a consistant depth around the whole door.
The 1960 Edsel side trim consisted of a spear of chrome that runs from the upper-middle of the
front door all the way back to the base of the rear bumper in a sweeping arc. This can
be accomplished on your model in a number of ways including masking and painting it
on. But I found that the 0.020-inch styrene rods that were used in the making of the
tailgate panel are perfect for giving your trim a 3-D look and feel.
Using the plastic cement on such a thin strip, however, proved to be a mess. The cement
tends to melt the structure of the rod, making it very difficult to keep in a tight line, and
it didn't cure fast enough to avoid smearing. So after recovering from the first attempt
by re-sanding the side, I tried another approach. Spray your 0.020 strip with a shot of
clear lacquer paint. This keeps it rigid so it can be positioned, while giving it just
enough adhesive power to stay right where you put it.

Before painting the body, drill an antenna hole. Unless you want to fabricate a tiny "radio delete" plate, your car needs a radio antenna. Don't install it yet, but prepare a small hole in the body, on the panel between the hood and the driver's door. The hole doesn't need to be deep or wide, just enough to fit the antenna from the '60 Starliner kit.
 Paint
Start with carefully brush-painting the inside of the body shell whatever your main interior
color is. You can leave the inside roof bare, but paint around the inside of each
window and down each column into the body shell, because you don't want any unpainted surfaces
to be visible through any gaps when the interior is installed. Take care not to get
any paint on the outside surfaces of the car's body.
Paint
Start with carefully brush-painting the inside of the body shell whatever your main interior
color is. You can leave the inside roof bare, but paint around the inside of each
window and down each column into the body shell, because you don't want any unpainted surfaces
to be visible through any gaps when the interior is installed. Take care not to get
any paint on the outside surfaces of the car's body.
Cover the body and window frames with masking tape, leaving the roof exposed. Roof
color extends between the windshield frame and the tailgate glass frame. This
includes the section of tailgate door above the glass. Holding the spray can about
a foot away, spray the roof with a side-to-side motion that extends beyond the painting
area.
Allow this to dry completely, and remove the masking.
Repeat the process for the body by masking off the painted roof with blue painter's
tape. Note that the Villager body color extends above the side windows. Mask
off the lens portion of the taillights, too. With no other parts installed, paint
the body of the car - right over the taillights and side spear - with the sweeping
motion used for the roof. Remove the masking and allow the car to dry completely,
in a dust-free area.
Once it's dry, with a detail brush, apply chrome paint to the vent window frames, windshield wipers and taillight housings. These are a little too small to work with the chrome metal foil that's coming up. After the taillight housings are dry, use the detail brush to paint the outer lenses with the "Taillight Red", and the inner lenses with the same "German Silver" that was used on the interior. You can also paint the grille with a "washout" of flat black to make it appear open and real, but I didn't attempt to use this project to learn how that's done.
Remember the tailgate bar that you fabricated from raw styrene? Now's the time to cement it in place. Carefully scrape away the paint from the car's surface where the cement will be applied, and glue the bar to the tailgate. Allow this to dry thoroghly before moving on.
Apply Chrome I've never used bare-metal foil before this, so I wasn't sure what to expect. Here's what I discovered: Do not use old stock. My first sheet had little cracks throughout the whole thing, which I thought was the way it came - that burnishing/polishing would get rid of them - but it was very difficult to cut long pieces that would stay together. Knowing I'd need more, I had the hobby store order me another sheet, and this one was fresh and smooth. What a difference! Always use fresh chrome.
The results took my breath away - this stuff is fantastic! It takes a few tries
to get used to applying, as it has the ability to conform and adhere to complex surfaces
like magic. Cut small rectangles and place them on the door handles. Press
down with your thumb and voila! Perfectly wrapped chrome handles! Repeat
for the tailgate handle. Wrap the rear bumper by starting on the flat, horizontal
surface and pressing it around the bumper, over the Edsel ridges and license plate
area and around the back. Rub with a soft cloth to bring out the details.
The chrome strip that goes from the grille to the tailfin is just a long strip with
a slight flare on one end to accomodate the expansion at the grille. And the
chrome front and rear windshields are easier to make up using four straight pieces
rather than try to come up with angles. Add chrome foil to the tailgate bar by
applying a slightly oversized piece, pressing it into place to form the details, and
then cutting away the excess with the Exacto blade. Add curved pieces of foil to
connect the bar up and across to the fin, and down around the edge of the rear end
on both sides of the outer tail lamps. Finally, run a thin strip from the
windshield to the base of the rear window to separate the roof color from the body
color.

Apply Edsel/Villager Scripts As was mentioned
on the Phase 1 page, I've since learned that there are better options
than applying chrome paint with a rubber stamp for the E-D-S-E-L and Villager
scripts. It was difficult to apply the right pressure and angles. Go with
the photo-etched scripts from
Model Car Garage (EDSEL on both rear quarter panels and along the rear door,
and Villger on each front quarter panel and across the chrome-foiled tailgate bar).
A reader named "Silvesterman" was kind enough to offer an alternative way to use the
rubber stamp:
Final Assembly We're almost there. The clear vinyl that forms the interior glass was a little loose and sagging (but after 47 years, aren't we all?), so I sanded the corners that can't be seen when the model is assembled, and used a hot glue gun to tack the piece to the roof so it stays nice and tight.
Before installing the inside cabin, take the rear view mirror from the '60 Starliner kit and glue this into place. Note that the shaft of the mirror isn't mounted straight up and down - it follows the contour of the windshield.
Once this is dry, install the interior, line up the front grille and rear bumper, and carefully screw on the base. For the first time it's not just a heap of pieces! Attach the sideview mirror on the driver's door with a touch of plastic cement, just to the front of the vent window. Use either the standard Ford mirror from the '60 Starliner kit, or the hooded Edsel mirror from the '58 Pacer kit. Or none at all if you prefer - no mirror was a valid option, too! If your original Country Squire had hood ornaments, replace them now. Otherwise, cement the hood ornaments from the '60 Starliner kit onto the quarter panels in the holes provided. Place a droplet of cement on the antenna base and install it in the hole you made earlier, holding it in place for about a minute to allow the cement to take hold. Finally, cement your fabricated license plates onto the front and rear bumpers.

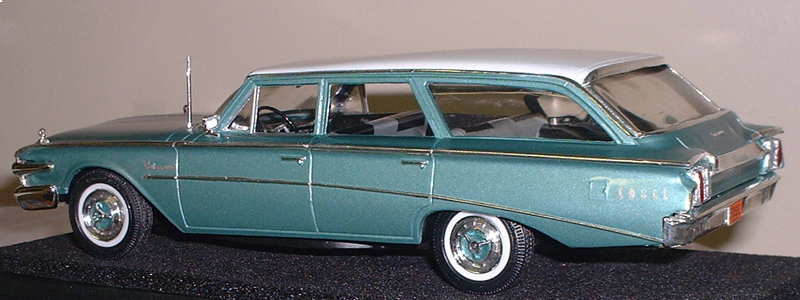
Now get yourself a case for it and enjoy your new 1960 Edsel Villager 6-passenger station wagon!